

dsh-web
zhu1090093659/dsh-webDeepSeek Harness(DSH)Web 插件聚合生态包 · 一切皆插件,创意工坊分发(dsh-market.com)

Same Harness. Same Workspace. Same Session.
Your agent keeps running wherever it already is. This puts a native VS Code client in front of it:
attach to the Harness on this machine, read the session the browser is reading, answer its
approvals, and review every edit in VS Code's own diff.
English | 简体中文
Install · Open VSX · Download VSIX · Changelog · How it got built
An independent, unofficial community project — not affiliated with, endorsed by, or published by DeepSeek.
The 30-second trailer, cut down to its two product beats. The silence is deliberate — there is no narration, the film says it in type. Play it · How it got built (中文版: STORY.zh-CN.md)
| What it is | A client for a dsh web you already have running. It attaches to that Harness and continues its workspaces and sessions inside VS Code. |
| What it is not | An agent, a model provider, or a replacement for either. None of the orchestration is reimplemented here — it stays in the Harness. |
| What it needs | VS Code ≥ 1.85, and a Harness on the same machine as the window. That is the one hard constraint; see Remote development. |
| Install | code --install-extension lucasliang.harness-connector-deepseek |
Jump to: What it does · What's new · Quick start · Configuration · Commands · Remote development · Limitations · Development · Design
@ mention, including the line range for a selection.dsh web and take the launch URL it prints, or paste a launch URL yourself. auto — the default since v0.2.8 — does the first and falls back to the second. See How the session is obtained.DeepSeek Harness: Install Host runs the install in the extension host — on a Remote-SSH window, that is the remote — so you never end up with dsh on your laptop and a remote that still has none. Managed launch also retries through npx by itself when dsh is not on PATH, which needs no install at all.This is not a Cursor replacement, a Claude Code replacement, or a full coding agent. It connects VS Code to your already-running local dsh web instance:
Browser ─────┐
             │
             ▼
       DeepSeek Harness
             ▲
             │
VS Code ─────┘
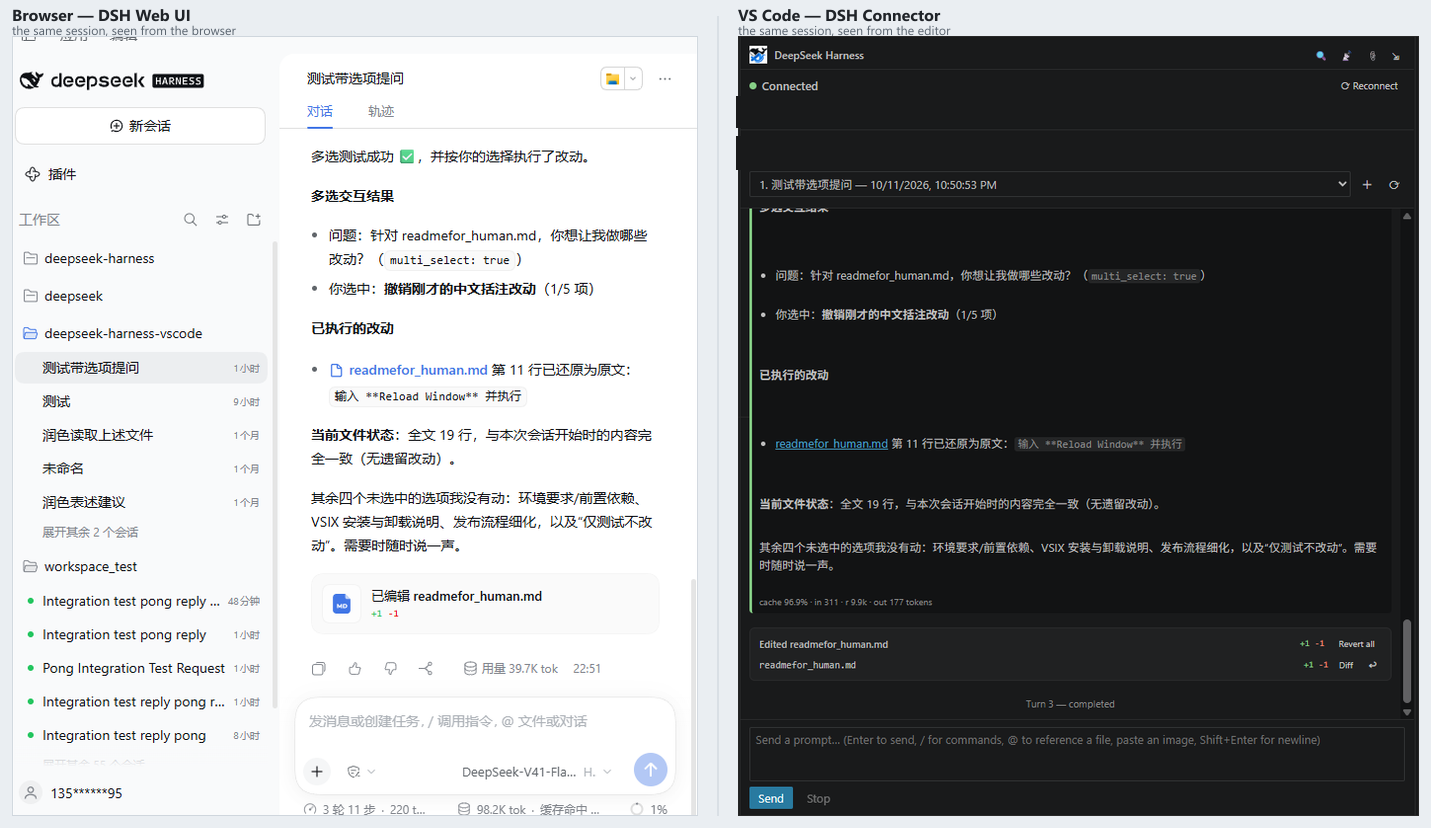
VS Code reads the workspaces and sessions the browser already has, and continues the same session — so a browser refresh of that session sees exactly what VS Code sent.
 |  |
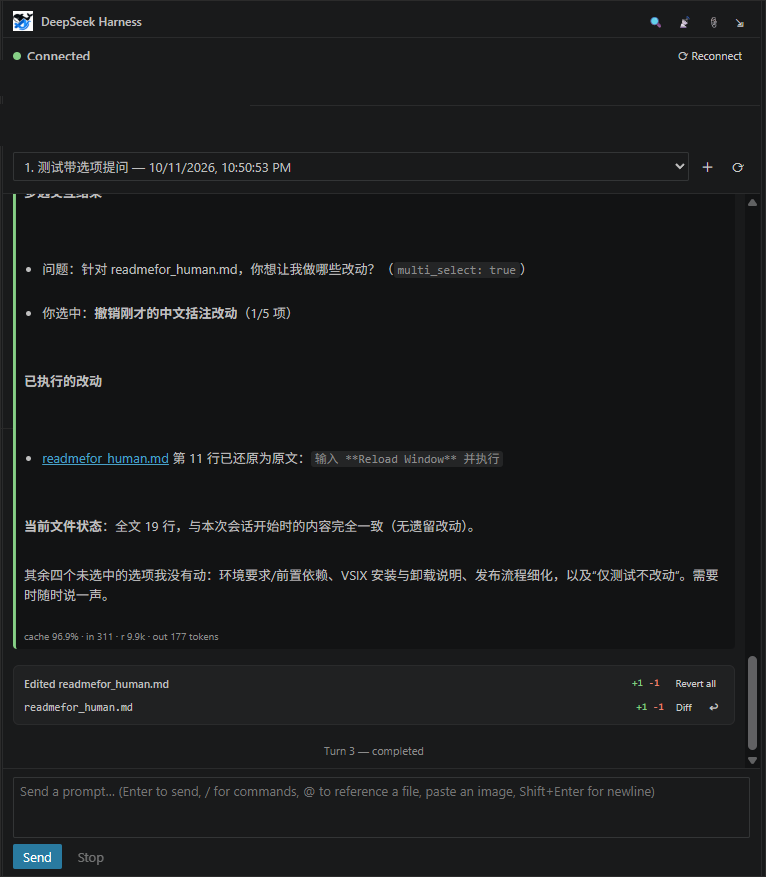 |  |
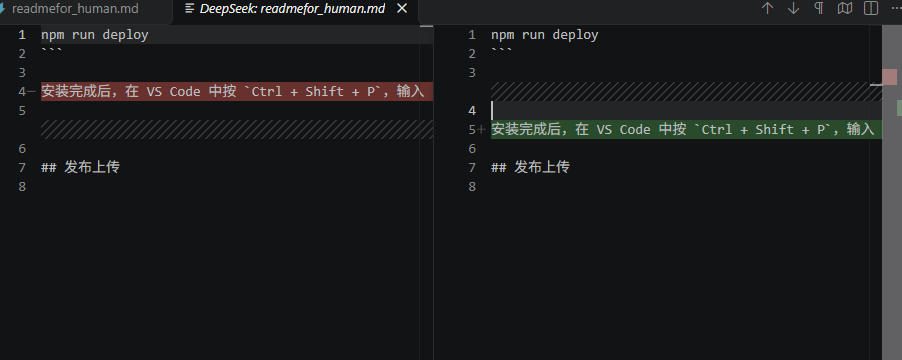
Top left: the same session at the same moment in two clients — nothing imported, mirrored or forked. Top right: "Diff" is VS Code's own diff editor, not a webview imitation — the left side is the text the plugin captured before the change. Bottom left: the conversation lives in the sidebar, tool rows and changed-files card included. Bottom right: the browser side, untouched.
Pick the model in the editor, and prove "Open Web UI" works without opening a browser.
Two changes landed. Model and thinking-depth selection now lives in VS Code — a model ▾ / thinking ▾ bar under the composer, and a Model group in the ⚙ Settings panel, both going through the Host's session/selectModel and persisting as a durable model/selection event. And npm run verify-webui mints a cookie through the extension's own BrowserSessionAuth and hits the live Host: 401 with no cookie, 200 with the minted one — a one-command end-to-end check instead of trusting the unit test.
| Model & thinking depth, in the editor | A model ▾ / thinking ▾ bar under the composer applies from the next turn. The ⚙ Settings panel has a Model group too, with "reset to Host default" and "fall back when unavailable". The choice goes through the Host's session/selectModel and lands as a durable model/selection event — reload the session and it is still there. |
npm run verify-webui | End-to-end proof that Open Web UI works: it mints a cookie through the extension's own BrowserSessionAuth, then hits the live Host — 401 with no cookie (the Host gates /), 200 with the minted one. Run it before a release instead of trusting the unit test. |
Verification:
| Gate | Result |
|---|---|
| Protocol assertions | 602 assertions — 533 in v0.3.0 |
| End-to-end chains | 96 across 3 of 5 chains |
Live Host (0.2.1-rc.2) | 42/42, both authentication paths |
| Version gate | 52 checks |
Most of the 26 new assertions pin the model-selection persistence and that request/header can still override it.
The release before this one — v0.4.0 — closed three dead ends (Open Web UI, privileged approvals, and a transcript that re-sent itself) and added the settings panel and first-run prompt. Its notes, and every earlier release's, are in CHANGELOG.md.
dsh web (default port 3080), either already running or started for you by the default sessionMode: "auto".Start Harness locally — or skip this step and let the extension do it (it is the default):
dsh web
# → http://127.0.0.1:3080/?token=<43-char token>
Recent Harness builds print a launch URL carrying a per-process token. You do not need it for the default setup — use it to open the Web UI in a browser if you want both surfaces side by side. (The token is a per-process secret compared on every request, not a single-use grant, so reloading that URL keeps working.)
Skipping this step is the default: deepseekHarness.sessionMode is "auto",
so when nothing answers on the port the extension starts the Host itself and
takes the URL off its console. See
How the session is obtained.
Older builds serve /api/* unauthenticated and need no token at all — the
plugin detects which it is talking to, so if no launch URL appears you can
simply ignore this step.
Install from the VS Code Marketplace or via command line:
code --install-extension lucasliang.harness-connector-deepseek
Or install the VSIX from GitHub Releases:
code --install-extension harness-connector-deepseek-0.4.1.vsix
Nothing to configure. The default sessionMode: "auto" first does what
credentials does — read the browser-session signing secret out of
$DSH_HOME/.credentials.yaml and mint the cookie itself, with no token to paste
— and if nothing is listening, it starts dsh web instead. Read
How the session is obtained for what that
implies, and for the two modes that never open that file.
Open a folder in VS Code that you want to bind to a Harness workspace.
The DeepSeek Harness activity-bar icon appears; the extension auto-connects. If your folder matches an existing Harness workspace, its sessions appear in the dropdown. Pick one and continue the conversation.
No matching workspace? Just type a prompt and hit Send — the workspace and session are created automatically.
Reference a file with @ — type @ in the input and a completion list appears; pick one and it is inserted as a mention (@src/main.ts). Right-click a file in the explorer and choose Add to Harness Chat, or select text in the editor and choose Send Selection to Harness to insert @src/main.ts:L10-L20. Nothing is pasted into your message: the mention is a pointer, and the host tells the agent to open the file itself. That keeps your prompt text (and its KV cache) stable no matter how large the file is.
Open the same session in your browser at http://127.0.0.1:3080/ — both surfaces see the same turn.
The harness authenticates /api/* with a browser-session cookie, and there are
four ways to get one here. deepseekHarness.sessionMode picks which.
auto (default) — mint if you can, start a Host if you cannot. The two
questions that looked like one: who are you is answered by minting from
$DSH_HOME/.credentials.yaml, while is anything listening is answered by the
socket. auto mints first and only reaches the launcher when the port answers
nothing, so a machine that already has a Host running behaves exactly as it did
before, and a machine nobody prepared gets one started. Modes below are the two
halves, for when you want one of them and not the other.
credentials — mint it locally, and nothing else. dsh web keeps a persistent
signing secret in $DSH_HOME/.credentials.yaml (client-connection/browser-session).
The cookie is an HMAC over {version, authority, issuedAt, expiresAt} keyed by that
secret, the cookie carries no trace of the launch token, and the secret is created
once and reused by every later dsh web process — so anything that can read the file
can mint a byte-identical cookie. The extension reads it and mints the cookie itself.
That is why there is nothing to paste. It never starts a Host: choosing this mode on
a machine with nothing running is a decision to run dsh web yourself.
managed — let the extension start the Host. It runs deepseekHarness.launchCommand
(dsh web --port 0 by default), reads the launch URL off the console of a process it
owns, and redeems that token. No credential file, no paste. The Host it started is
stopped when the window closes.
paste — start it yourself and hand over the URL. Run dsh web, copy the
dsh web: http://… line, and run DeepSeek Harness: Use Launch URL. Nothing is read
from disk and nothing is started.
About minting, since the default may do it and it is a real privilege:
managed is the answer to both of those. If reading that file is not a trade you
want to make, switch modes — you lose nothing but the process the extension starts.settings.json. DeepSeek Harness: Diagnostics exports a report you can read in full
before sending it anywhere.This is a workaround, and we would rather it were not necessary. The sanctioned
flow is exchanging the per-process launch token, and managed/paste do exactly
that — but nothing writes the token to disk, so a client that did not start the Host
itself had no way to obtain it, which is what made reading the signing secret the only
zero-configuration path. A first-class local-client authorization flow would close the
gap properly: a socket, or a one-shot token file written 0600 and scoped to a single
client. Until Harness ships one, the three modes above are the honest menu.
The connect error names the cause and the file or command it looked for. There is no silent fallback.
| Situation | What to do |
|---|---|
$DSH_HOME points elsewhere and the env var is not set | set DSH_HOME for the VS Code process, or start dsh web with the default home |
dsh web has never run in this harness home | run it once — the client-connection/browser-session record is created then, or set sessionMode: "managed" so only the launcher is used |
No dsh command on PATH under managed | managed launch retries through npx first; if that fails too, the panel offers Install Host; on Windows and macOS the desktop app also registers dsh for you |
managed ran but dsh exited immediately | usually the port is already taken — the log carries the child's own last lines |
You are in paste mode and have not pasted yet | run DeepSeek Harness: Use Launch URL |
A cookie obtained this way still lives its own life: the extension stores it in VS
Code's secret storage (OS keychain — never settings.json), it survives dsh web
restarts, and it is only re-derived when it expires or you change host/port
(the cookie name is dsh-auth-<sha256(host:port)>, so it is bound to the
authority that minted it).
Everything below is also editable from the panel: ⚙ Settings & help lists each knob with the sentence that explains it, and carries the actions that used to live only in the command palette — Find running Host, Install Host, Diagnostics, Show logs and Open Web UI.
| Setting | Default | Notes |
|---|---|---|
deepseekHarness.host | 127.0.0.1 | Exactly three values are accepted — 127.0.0.1, localhost, ::1. Any other value is refused before a socket is opened. See Remote development. |
deepseekHarness.port | 3080 | The default dsh web port. Override if you started dsh web --port <n>. |
deepseekHarness.showSystemMessages | false | Show plugin-injected system messages (runtime context, approval notices). Hidden by default; toggle live with the SYS button in the webview header. |
deepseekHarness.sessionMode | auto | How a session is obtained. auto mints locally from $DSH_HOME/.credentials.yaml when it is readable and starts dsh web when nothing answers; credentials only mints; managed only starts; paste waits for you to supply a launch URL. See How the session is obtained. |
deepseekHarness.launchCommand | dsh web --port 0 | The command sessionMode: "managed" runs. The default binds an OS-assigned port, because managed launch reads the real port off the launch URL and pinning one only adds a way to fail. Run through a shell, so wrappers and npx work. If the default command is not found, managed launch retries once through npx — which on a remote fetches and starts the Host there; a command you set yourself is never substituted. Read only when a Host is started; changing it does not disturb a running one. |
deepseekHarness.autoApproveApprovals | false | Automatically answer incoming approval requests with allowed-once. Off by default — enabling it means tools run without per-call confirmation. |
deepseekHarness.autoDiscover | true | When the configured port answers nothing, look for a dsh Host elsewhere on loopback (pinned webserver.port first, then the OS listener table, confirmed by the Host's own refusal text). Needed by the desktop app, which starts its Host on an OS-assigned port. The discovered port is session-local and never written to your settings. |
DeepSeek Harness: Connect / Reconnect / Disconnect — Reconnect (also the ⟳ button in the panel header, and the always-visible button in the status row) drops whatever is live and negotiates a fresh sessionDeepSeek Harness: Diagnostics — one document with the runtime version, this extension's version, connection state, which capabilities the Host actually serves, and the last error. Offers a Copy redacted report action; nothing credential-bearing is includedDeepSeek Harness: Clear Session Token — drop the stored cookie and reconnect (a fresh one is minted under credentials, or a fresh Host is started under managed; use it before switching dsh web instances)DeepSeek Harness: Use Launch URL — paste the dsh web: http://… line a Host printed and adopt its session. The paste route, usable in any modeDeepSeek Harness: Switch to Auto and Connect — what the status row's repair button runs: persist sessionMode: "auto" and force a reconnect, which is the one-click answer to "nothing is listening" under credentialsDeepSeek Harness: New Session (in the active workspace)DeepSeek Harness: Refresh SessionsDeepSeek Harness: Move to Right Side Bar — dock the view in the secondary side bar (like Chat) so it stops competing with the file explorer. Also available via the ⇲ button in the webview header.DeepSeek Harness: Toggle Plan Mode — flip /plan on the active sessionDeepSeek Harness: Set Permission Preset — pick (or type) a preset such as read-only / workspace-write / danger-full-accessDeepSeek Harness: Compact Session Context — request /compactDeepSeek Harness: Fork Session — branch off the current session and switch to the forkDeepSeek Harness: Rename Session — pin a title (stops automatic regeneration)DeepSeek Harness: Archive Session — archive it out of the active workspace listDeepSeek Harness: Attach File to Session — stage local images/files for the next prompt (images ride session/prompt as inline parts; other files upload to POST /api/session/uploadFileBinary and are referenced by receipt) — also available via the 📎 button and by pasting or dropping into the composerDeepSeek Harness: Install Host — install the dsh CLI in the extension host, which on a remote connection is the remote machine. Confirms first and names that machine; runs npm i -g @deepseek-ai/dsh; never elevates, so a system-owned npm prefix reports its own EACCES instead of escalatingDeepSeek Harness: Open Web UI — opens the token-bearing launch URL in your browser. Whichever route left the extension holding a URL — managed launch, or a launch URL you pasted — it uses it; credentials mode has no token to add and says soDeepSeek Harness: Show Logs (the DeepSeek Harness outpuDeepSeek Harness(DSH)Web 插件聚合生态包 · 一切皆插件,创意工坊分发(dsh-market.com)
把回答做成一页可视化 HTML:模型只写简短的 Markdown 草稿,随包附带的 `am` 命令行生成页面,支持流程图、时序图、树、时间线、ER 图、表格和提示框。
在 dsh 里装上这个插件即可,无需登录、注册或填 API Key,就能使用包括 Muse Spark 1.3、MiMo V2.6 在内的前沿模型——完全免费,不限量。 All you do is install this plugin in dsh: no login, no sign-up, no API key — the frontier models are just there, Muse Spark 1.3 and MiMo V2.6 among them. Completely free, with no usage cap.

