
dsh-web
zhu1090093659/dsh-webDeepSeek Harness(DSH)Web 插件聚合生态包 · 一切皆插件,创意工坊分发(dsh-market.com)

dshell — a terminal-first AI workbench built as dsh plugins: one terminal timeline per session, cross-session pipes with a named buffer, SSH device sessions. | 终端优先的 AI 工作台(dsh 插件集):一个会话一条终端时间线,跨会话管道委派与缓冲区文件共享,可把会话直接开到 SSH 设备上。
English · 简体中文
One session is one terminal timeline: you type in a real shell, and the AI keeps working on the same screen. Every command you run and every turn the AI takes land in one column, in the order they happened. No chat bubbles.
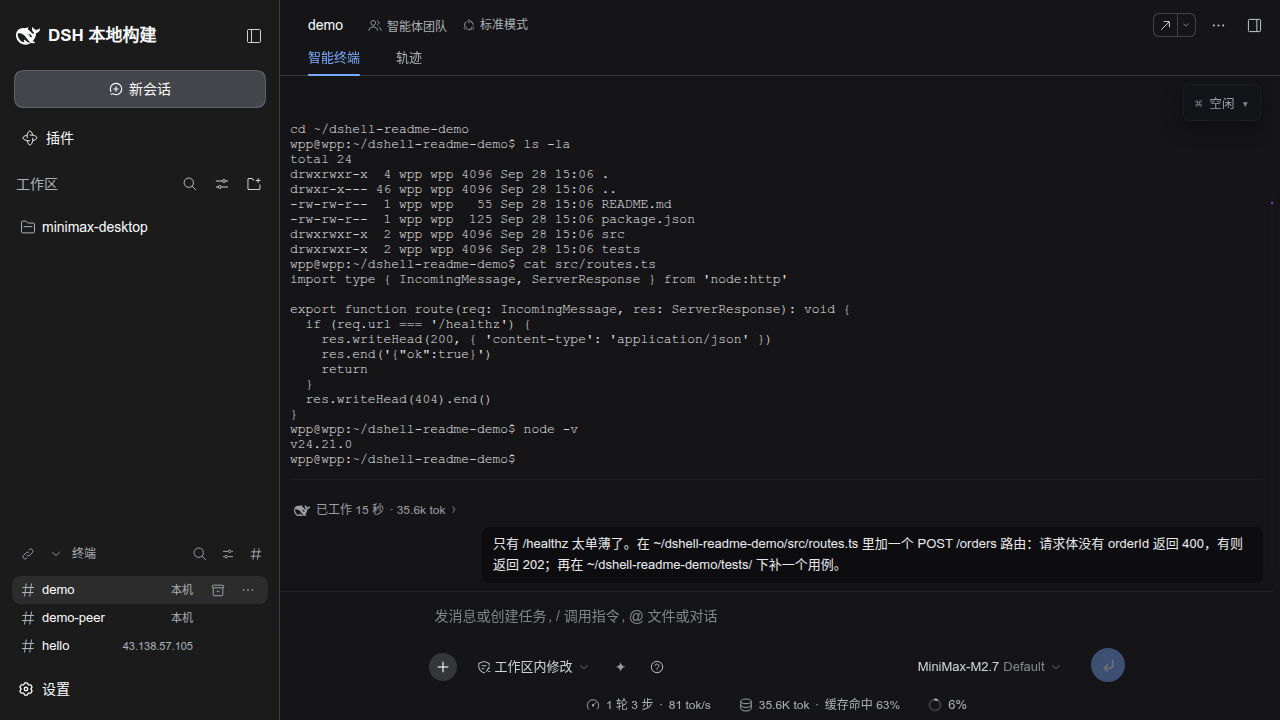
The screenshots show the Chinese interface. dshell follows dsh's own language setting (Settings → General → Language), so every dshell surface is available in English too.
dshell is a set of plugins for dsh (DeepSeek Harness). It does not modify dsh's source: it plugs into dsh's documented extension points, so dsh stays upgradeable with upstream.
$ shell and ✦ agentdshell is two layers: a view you look at, and a host that does the work. What you see is always a view of something else — which is why one column can hold your shell output and the AI's turns at once, and why a session can be pointing at another machine while the window stays here.
flowchart TB
  subgraph WIN["The window — a browser, or the desktop app"]
    UI["One column: your shell output and the AI's turns<br/>the input line, the sidebars"]
  end
  subgraph HOST["The host — one Node process"]
    CORE["dsh's own core<br/>sessions, the agent, the tool registry"]
    subgraph ROWS["dshell's plugin rows — eleven packages"]
      VIEW["mode + terminal-bridge<br/>the view, and the PTYs behind it"]
      PANE["files + ssh<br/>the file pane, and where a session runs"]
      LINK["buffer<br/>pipes, and the buffer between them"]
    end
    ROOT["the data root<br/>where dshell keeps its own files"]
  end
  subgraph WORLD["Where the work happens"]
    HERE["This machine<br/>a real shell, a real tree"]
    THERE["A device<br/>a real shell, a real tree"]
  end
  UI <-->|"one websocket"| CORE
  CORE ---|"plugged in at dsh's extension points"| ROWS
  VIEW -->|"your shell, your files"| HERE
  VIEW -->|"the same session, pointed elsewhere"| THERE
  PANE --> HERE
  PANE --> THERE
  LINK -.->|"files by name, between sessions"| HERE
  LINK -.-> THERE
  VIEW --- ROOT
  PANE --- ROOT
Three bands, top to bottom:
$DSH_HOME/dshell) is where they keep their
own files.The seams are where the interesting behaviour lives, and each has its own section below: the two PTYs (the AI has a terminal of its own), the file pane and the device routing (SSH device sessions), and the pipes and the buffer (cross-session collaboration).
| What you get | Details |
|---|---|
| A full-bleed terminal | One main shell per session, running real commands — full screen, colours, cursor |
| One merged timeline | Shell output and AI work interleave by time; each AI turn is a collapsible task block |
| Two modes | $ shell makes Enter run a command, ✦ agent makes Enter send to the AI — the $ / ✦ glyph in the input line is the mode, click it to flip |
| The AI's own shell | The AI gets a separate PTY, so it never blocks your foreground program and never steals your terminal |
| Cross-session work | Sessions form pipes to delegate tasks to each other and share files by name (the buffer) — including across SSH devices |
| Device sessions | Open a session directly on a remote machine: commands, files and the visible terminal all run there |
| Context without retelling | Switching to ✦ agent automatically carries your last few commands and their output to the AI |
0.1.15 gives a device session a panel of its own: what is running on that machine, which
containers are up, and who is holding each port — written down on the right, instead of answered
by a terminal you had to open yourself. It is on npm as 0.1.15 and needs dsh 0.2.1-rc.3.
| What changed | What you notice | |
|---|---|---|
| The device panel | dsh's right sidebar gains a device tab of its own — a tab kind of dshell's, so it takes nothing from dsh's shipped panes — and the start page gains a card that opens it | Four pages: 概览 / 进程 / 容器 / 端口 — the machine's identity and its load, then one list each |
| The lists are tools, not a readout | A machine with two hundred processes and forty sockets cannot be read by scrolling | Filter by what you know, order by any column (a second column breaks the first one's ties), open a row for the whole command line, and let a port lead to the process holding it |
| One round trip, one answer | The device is asked with a single bash -c, so the SESSION decides the machine | The host's own routing says whether that is this machine or the session's device — and nothing in the package knows that ssh exists |
| The column heads sort again | A head asked for its column with key="cpu", and key is a reserved React prop: React ate it, every head's key was undefined, and the order never moved | Clicking CPU reorders the list, and the triangle beside it turns that one column around without dropping the tie-break you set up |
| The load is not a dash any more | The panel read the load without subscribing to it, so the load was only as fresh as whatever else happened to be watching | The overview's CPU, memory and load are live whenever the panel is open |
| The list pages do not fold | Once you are on the device's detail page, the list is what you came for | The count moved beside the filter that changes it, and it says 12 / 168 when it narrows the list |
dsh 0.2.1-rc.3 is supported | Every dsh peer range dshell declares now includes it | The plugin installs on a 0.2.1-rc.3 dsh — the published 0.1.14 does not install there at all |
Two ways in: install the published plugins into a dsh you already have, or build from this checkout.
Prerequisites: dsh 0.2.1-rc.3 — either the desktop app, or the CLI
(npm install -g @deepseek-ai/dsh@next) — and Node 24.21.0 with pnpm 9.15.0 on PATH
(dsh plugin forwards to pnpm). On npm, 0.2.1-rc.3 is the next tag and 0.2.0-rc.2 is latest.
Which dshell release you want depends on which dsh you have:
| dsh | dshell |
|---|---|
0.2.1-rc.3 | 0.1.15 — the npm latest dist-tag |
0.2.1-rc.2 | 0.1.14 |
0.2.0-rc.2, 0.2.0-rc.1, 0.1.7-rc.2, 0.1.6-alpha.2, 0.1.5-rc.2 | 0.1.13 |
dsh checks every @deepseek-ai/dsh-* peer a plugin declares against its own version and skips the
whole bundle when one does not match, so a dshell release names the exact dsh versions it supports.
To run one anyway: dsh plugin --profile <name> allow-version <package@version> --dsh-version <exact> --accept-risk, which records the grant in the profile's compatibility.json.
# One package: the bundle is the patch layer, it depends on the other ten dshell
# packages, and dshell-ssh carries the one dsh package a stock profile does not
# ship (`@deepseek-ai/dsh-ssh`, its SSH execution provider).
dsh plugin --profile web add -w @nexus-aethra/dshell-bundle@0.1.15

dsh web
dsh prints a tokenized URL (for example http://127.0.0.1:3080/?token=…). Open it in a browser.
In the desktop app, the same install is available as a window: 设置 → 插件, and give it
@nexus-aethra/dshell-bundle@0.1.15 (it installs from npmjs and pins the version exactly).
Skipping step 2 is not fatal — dsh boots and reports the two rows as
did not activate, and the rest of dshell works. It is listed because the SSH device sessions and the agent's terminal tool both resolve those names from the profile.
The bundle carries every dshell package and its own cordis.patch.yml, so dsh composes the dshell
rows the moment the package is installed: no profile edit, no config file. dsh plugin --profile web list shows the resulting layer stack.
Prerequisites: the same Node and pnpm, plus an upstream dsh/ checkout next to this repository (it
is git-ignored here).
# 1) dsh upstream (once)
cd dsh
pnpm install --no-frozen-lockfile
pnpm run build:lib && pnpm run build:web

# 2) the dshell plugins
cd ..
pnpm install
pnpm --filter "@nexus-aethra/dshell-*" run build

# 3) install into dsh's web profile (once; re-running is safe)
./scripts/install-into-dsh-profile.sh
./scripts/bootstrap-profile-client.sh

# 4) every time
cd dsh && pnpm dsh web
Check either install with
curl -sS -o /dev/null -w "%{http_code}\n" http://127.0.0.1:3080/ — it should answer 401,
which is dsh's cookie auth gate, not a failure.
The details and the troubleshooting (why the versions are pinned, how the profile gets filled in, the module-loader contract for client bundles) live in
docs/dshell-setup.md.
The left sidebar holds your sessions, the middle is the terminal timeline, the status card floats in the top right, and the input line sits at the bottom.
| Area | What you can do |
|---|---|
| Left sidebar | Create and switch sessions; 归档 files one away into the 已归档 group; 多选 then batches 恢复 / 删除; a deleted session first moves to 待删除 · 重启后清除 |
终端 section | Its own section below the workspace list: the link glyph first in its header opens the cross-session pipe panel (provided by dshell-buffer, and it survives the fold, being the panel's only entry); + mints a terminal session; the pill at the row's end says where that shell runs (本机 or the device name); double-click the title, or use the row's ⋯, for 重命名 / 归档; the section header also carries the search and the archived filter |
| Right sidebar: files | The 文件 tab browses the session's working directory with back/forward; double-clicking a directory makes it the root; drag a directory onto the terminal to cd there; device sessions also get 打开文件传输 |
| Status card | Always in the top right, collapsed to one line; expand it for the AI terminal, subagents, background jobs, buffer transfers and delegation replies |
| Input line | the $ / ✦ glyph is the mode — click to flip, hover for its name; ? names the gestures that are live, on hover |
The timeline is the point: a stretch of shell output occupies one region (a real mini terminal that scrolls horizontally), and one AI turn occupies one task block. The block's header line says what it is doing, for how long, and what it has spent; clicking it folds the block into a two-line summary.
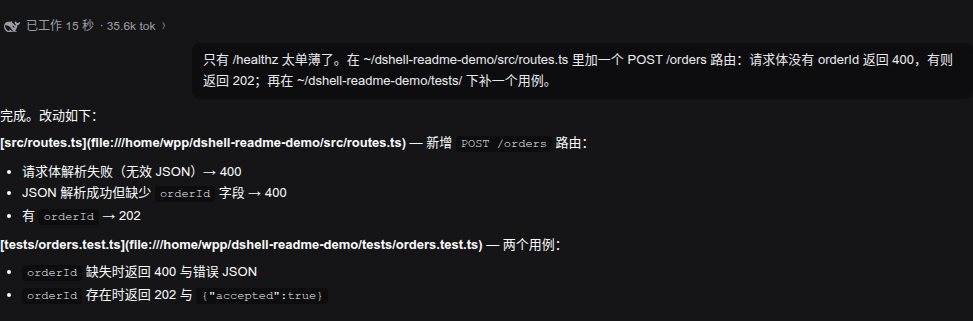
$ shell and ✦ agentThe $ / ✦ glyph at the left of the input line is the mode — click it to flip, hover it to read
which one it is. The same switch is a slash command typed right in the input box:
| Input | Effect |
|---|---|
/shell <command> | Switch to shell mode and run the command immediately (/terminal is an alias) |
/agent <text> | Switch to agent mode and send the text to the AI |
/fullscreen | Hand the whole surface to the program on the terminal (the way in when the reading misses) |
/new | Create a session that inherits the current session's working directory |
In $ shell mode:
Enter runs the line, into the foreground process of the main shellCtrl+C abandons the line and interrupts the terminalCtrl+Shift+V hands the clipboard to the terminal/ still goes down dsh's command channel (/compact and friends are untouched)In ✦ agent mode Enter simply sends. Switching to agent mode also attaches your last three
commands and their output (2 KiB each, with the agent able to page further on demand), so you never
have to explain "that command I just ran failed".
flowchart TB
  IN["The input line — one keypress either way"] --> S["$ shell<br/>Enter runs the line in this session's shell<br/>Ctrl+C abandons it"]
  IN --> A["✦ agent<br/>Enter sends the line to the AI<br/>your last three commands come along"]
  S -->|"click the glyph, or /agent"| A
  A -->|"click the glyph, or /shell"| S
Every session has two shells:
Neither can take the other's foreground. The AI cannot type into your terminal; it can only read it
(dshell_terminal_read). To watch what it does in its own shell, expand the status card's AI 终端
row: a read-only live view, with 为 AI 开启一个终端 whenever it is not running.
If dsh's bash tool spawns a persistent shell in the same session, dshell claims it as the AI's
terminal, so the model's bash calls, terminal_send, and the panel you are watching all converge on
one PTY — no more "the panel shows one shell while the model ran its command in another".
flowchart LR
  YOU["Your main shell<br/>the foreground, full width"] -.->|"the AI may only READ it<br/>(dshell_terminal_read)"| AI["The AI's own PTY<br/>spawned on first need"]
  AI -->|"its own commands"| OUT["Its own output<br/>in the status card"]
A program that takes the whole screen — vim, htop, less, a coding TUI such as minimax-code —
gets the surface instead of the timeline. The composer steps aside, the terminal fills the column, and
every key goes straight to the program: the arrows, Tab, Escape, the control chords, and the mouse
reporting it asks for. This is the one case where the composer is not the input line, because a
program that reads the keyboard itself cannot share it with a line editor.
dshell decides this on its own, from two readings of the session's terminal: a foreground program that
is painting the screen (hiding the cursor, opening a synchronized update, enabling mouse reporting),
or the alternate screen that vim and friends switch to. Either one is enough. A long command is not
a full-screen program — npm install and sleep 30 keep their timeline.
flowchart TB
  T["The timeline"] -->|"a program takes the surface<br/>(vim, htop, less, a TUI)"| F["The program's own screen<br/>every key goes straight to it"]
  F -->|"it exits, or 退出全屏"| T
  F -.->|"its repaints are kept OUT of the timeline"| L["the session's raw log"]
| Getting out | the 退出全屏 button on the small bar over the program's own screen — or just quit the program, and the timeline comes back by itself |
| Getting in by hand | /fullscreen, for a program the reading misses |
| While it is on | the transcript is not rendered at all, and the program's output is kept out of the timeline on purpose: its repaints would land there as a wall of half-drawn screens. It is still in the session's raw log, so a reconnect replays the screen |
| A device session | only the alternate screen is read there (the local process is ssh), so the button is the way in for everything else |
All three live in the $ shell input line and each can be switched off independently.
flowchart TB
  W["the word under the caret"] --> P{"what the line says that word is"}
  P -->|"the command position<br/>(also after sudo, or after ;)"| C["command names<br/>from the session's own PATH"]
  P -->|"right after cd"| D["directories"]
  P -->|"anywhere else"| F["paths"]
  C --> R["one candidate lands directly<br/>several open a floating list"]
  D --> R
  F --> R
| Gesture | Behaviour |
|---|---|
Tab | Completes the word under the caret, from what the line says that word is: a command name in the command position (dock + Tab, and equally sudo dock + Tab or pwd; host + Tab), a directory after cd, a path anywhere else (a redirection's target included) — and the subcommands and options the session's own shell knows, so docker r + Tab offers rename/rm/run and apt list -- + Tab offers the long options. Names come from the session's own world — this machine's PATH for a local session, the device's for an SSH session — so the two answer with different names. The comparison folds ASCII case, but the completion carries the real spelling: cd nexus-sh + Tab becomes Nexus-shell/, correcting the line as it completes. A single candidate lands directly; several open a floating list (Tab/↑/↓ to move, Enter to take, Esc to close) |
↑ | Opens this session's history (↑↓ to move, Enter to take), listing only commands that share a prefix with what you have typed |
→ | Shows a ghost hint after the caret: the newest command that exactly extends your draft. Each → takes one word of it, and the ghost disappears with the last word |
The ? in the input line shows the same legend for the current state — → 采纳一个词 · 继续 while a
ghost is showing, Tab 下一个 · ↑↓ 选择 · Enter 填入 · Esc 关闭 while a list is open — and names the
mode in force. Hover it (or focus it with the keyboard) to read it. Turn an assist off and its key
reverts to the browser's behaviour (Tab moves focus, → moves the caret).
This is what separates dshell from other terminal workbenches: sessions are not islands.
Two sessions can be joined by a pipe, after which their AIs can delegate tasks to each other and share files. A pipe can span machines — either end may be a session bound to an SSH device.
flowchart LR
  A["Session A · this machine<br/>the window you type in"] -->|"pipe: deploy"| B["Session B · build host<br/>an SSH device session"]
  A -->|"pipe: review"| C["Session C<br/>another local directory"]
  B -->|"the result"| A
  C -->|"the result"| A
Click the link glyph at the left of the 终端 section's header (it survives the fold, being the
panel's only entry). The panel has two views:
列表 — + 建立管道, pick two sessions, give it a name (such as "build host") and a
purpose — one line saying what travels over this pipe and why — then 建立管道.图 — sessions are nodes and pipes are edges. Drag from a node's dot onto another node to
create one; click an edge to see its detail or 解除.A pipe joins terminal sessions — the ones the sidebar's 终端 section lists. A plain conversation
is not offered as an endpoint, and the host refuses one: the file pane, the device routing and the
section all key off the terminal identity, so a session that is not a terminal could not serve a
request anyway.
The purpose is the part the other side reads: it travels in the peer's standing prompt next to that
pipe, so a peer's model can tell whether an incoming request belongs there. Either end can write it —
you from the panel, an agent with dshell_buffer action="describe" — and the panel says when the words
are the other session's rather than yours (由 … 填写).
The panel says 只有你能建立管道;agent 没有建连的工具 — connecting is always your move; an AI can only
use pipes that already exist.
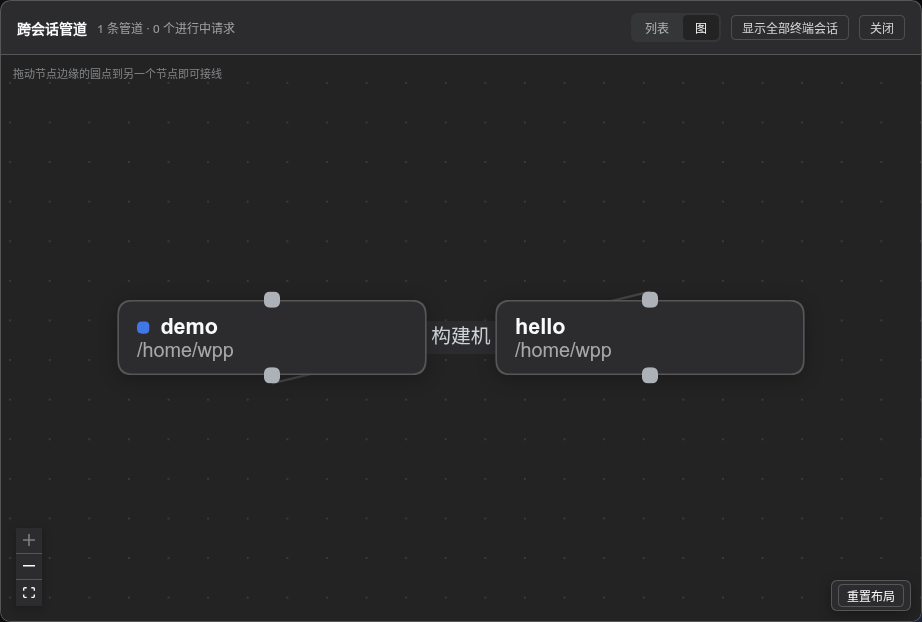
Delegation is asynchronous. A busy peer simply queues the request, and the requester does not block: its turn ends, and it is woken up again when the answer comes back.
sequenceDiagram
  participant U as You
  participant A as Session A (local)
  participant B as Session B (build host)
  U->>A: deploy this directory to the build host
  A->>A: check that the pipe is live
  A->>B: delegate the task, granting read on "src"
  Note over A: this turn ends<br/>status card shows ⏸ waiting for B
  B->>B: claim the ticket, read /src/… in its own world
  B->>B: run the build
  B-->>A: finish, report the result
  Note over A: [pipe report] arrives<br/>A wakes up and continues
  A-->>U: reports back to you
The peer sees only what you send it: not your other files, not your other sessions. Tickets have a
deadline; a watchdog settles an unanswered one as 已超时 and tells the requester, who can delegate
again or carry on alone.
flowchart LR
  Q["queued"] --> P["in progress"] --> D["done"]
  P --> F["failed"]
  P --> T["timed out"]
  Q --> X["cancelled"]
A delegation can open files or directories from your own world to the peer, each with a name and
read and/or write rights. That name becomes the peer's buffer path; the buffer is a tree rooted at
/, one per session:
flowchart LR
  subgraph W["Session A: real disk"]
    D1["/srv/app/README.md"]
    D2["/srv/app/releases/"]
  end
  subgraph B["Session B: the buffer at /"]
    P1["/readme"]
    P2["/app/releases/v0.4.2.tar"]
  end
  D1 -->|"grant as=readme, read-only"| P1
  D2 -->|"grant as=app, read+write"| P2
The holder of a grant works through five actions:
| Action | Effect |
|---|---|
ls | With no path, lists every mapped area you hold (name, rights, who it came from); with a path, lists a directory |
read | Reads a text file, paging by line |
edit | Edits that file in place inside the granter's world — no copy is made |
download | Copies a buffer file into your own world (at a destination you choose) |
upload | Pushes a file from your world into the buffer |
Two rules are worth remembering:
.., and symlink escapes are refused. The AI never needs to know your real paths, and cannot touch
anything else.download it. To
receive one, have them grant write and upload it yourself.Grants are reference counted: settling a ticket revokes its grants, and a grant at zero is gone — nobody has to remember to clean up.
Above 32 MiB, download and upload switch to a chunked relay: 16 MiB slices moved one at a
time, then verified end to end by a whole-file sha256. A mismatch is a hard failure and keeps the
intermediate data (1 GiB by default, 4 GiB hard ceiling). Progress shows up live in the status card's
⇅ 缓冲区传输 row, with a percentage and a bar per transfer, even with the panel closed.
Click
DeepSeek Harness(DSH)Web 插件聚合生态包 · 一切皆插件,创意工坊分发(dsh-market.com)
把回答做成一页可视化 HTML:模型只写简短的 Markdown 草稿,随包附带的 `am` 命令行生成页面,支持流程图、时序图、树、时间线、ER 图、表格和提示框。
在 dsh 里装上这个插件即可,无需登录、注册或填 API Key,就能使用包括 Muse Spark 1.3、MiMo V2.6 在内的前沿模型——完全免费,不限量。 All you do is install this plugin in dsh: no login, no sign-up, no API key — the frontier models are just there, Muse Spark 1.3 and MiMo V2.6 among them. Completely free, with no usage cap.

